

How to Scan Documents With Your Phone and Save Them as PDFs

You do not need a traditional scanner to turn a paper document into a PDF. An Android phone camera can scan documents and save them digitally, making it easier to store, share, print, or send them by email.

Depending on your phone and apps, you may be able to scan documents using a built-in camera feature, Google Drive, or another document-scanning app.

The exact buttons can vary between Android phones, so the steps below focus on the general process.

Main Points

  • Your Android phone can scan paper documents using its camera.
  • Good lighting makes scanned documents easier to read.
  • Place the document on a flat surface before scanning.
  • Keep the phone directly above the document when possible.
  • Multiple pages can usually be combined into one PDF.
  • Review the scanned pages before saving the final PDF.
  • Avoid photographing sensitive documents in places where other people can see them.
  • Use your own screenshots in the article to show readers exactly where to tap.

1. Prepare the Document Before Scanning

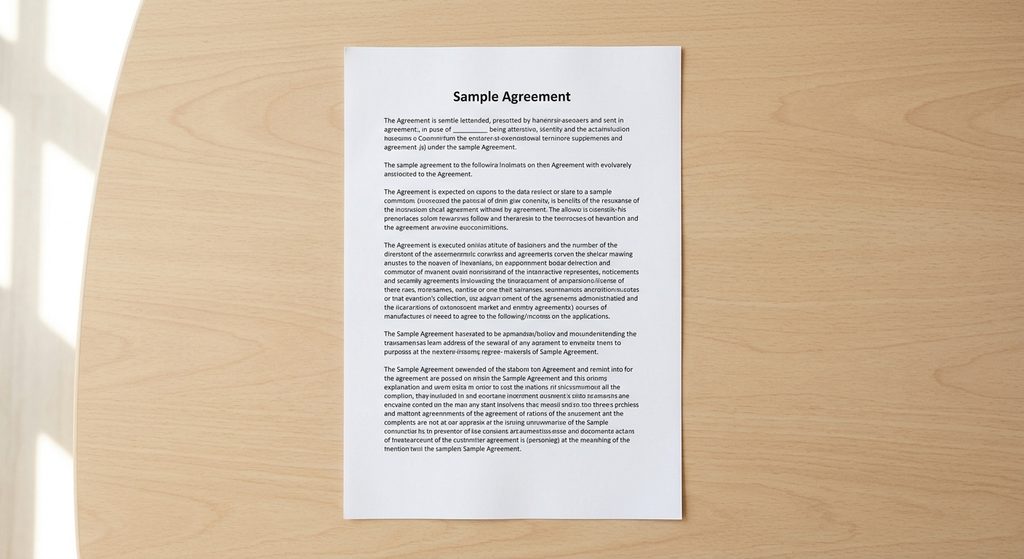
Start by placing the document on a flat, clean surface.

Remove anything that is covering the document, such as:

  • Other papers
  • Clips
  • Folders
  • Objects
  • Your hands

Try to flatten folded or curled pages as much as possible.

If the document has multiple pages, put them in the correct order before you begin.

A clean, flat document makes it easier for the phone camera to detect the edges and produce a readable scan.
2. Find a Document Scanning Feature

There are several ways to scan documents on Android.

Depending on your phone, you may be able to use:

  • A built-in camera document scanner
  • Google Drive
  • A dedicated scanning app
  • Another file or productivity app with scanning support

One convenient option is the document scanning feature available through Google Drive on supported devices.

Open Google Drive and look for the option to create or add a scanned document.

Your phone’s interface may look different depending on the Android version and app version.


3. Open the Scanner

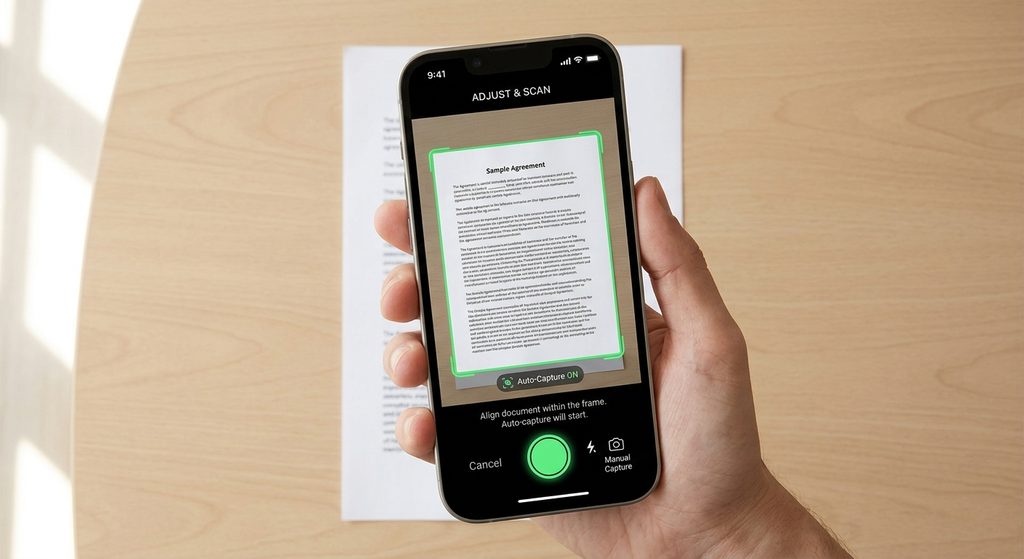
After selecting the scan option, your phone will open the camera.

Point the camera toward the document.

Try to position the phone so that all four edges of the paper are visible.

Keep the phone reasonably parallel to the document instead of holding it at a steep angle.
4. Use Good Lighting

Lighting has a major effect on scan quality.

Try scanning the document in a bright area with even lighting.

Avoid placing the document directly underneath a strong light that creates a reflection.

Also avoid creating a shadow over the paper with your phone or your hand.

If the text looks dark, blurry, or difficult to read in the camera preview, improve the lighting before capturing the page.

A few seconds spent preparing the lighting can produce a much better PDF.


5. Capture the Document

Once the document is positioned correctly, capture the page.

Some scanning tools automatically detect the edges of the paper.

Others may allow you to manually adjust the corners after taking the picture.

After capturing the page, check the result carefully.

Look for:

  • Missing corners
  • Cropped text
  • Blurry writing
  • Shadows
  • Reflections
  • Tilted pages

If the scan is difficult to read, capture the page again before continuing.


6. Adjust the Document Edges

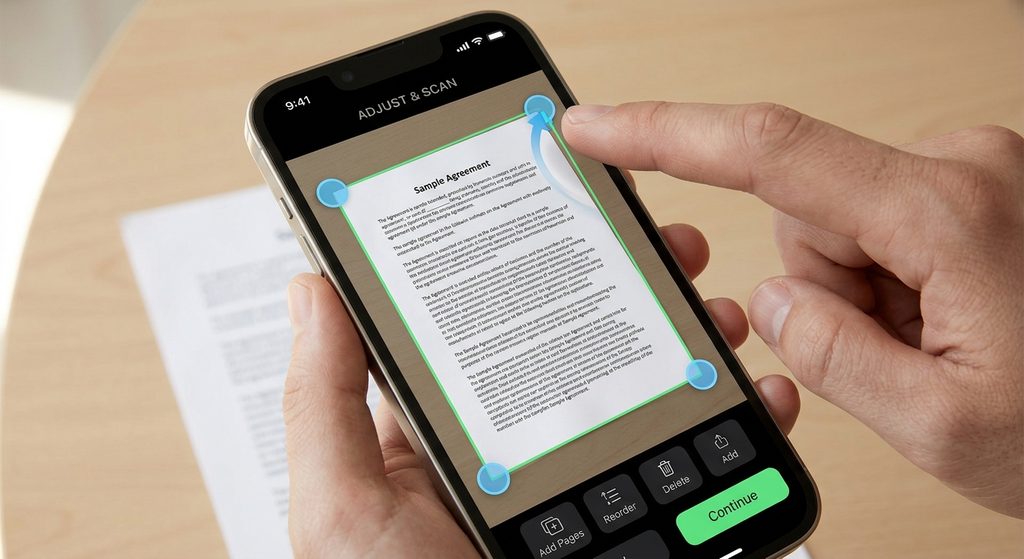
Some scanning tools allow you to adjust the edges of the document.

This is useful when the camera does not correctly identify the paper’s boundaries.

Move the corner points so that they follow the edges of the actual document.

Be careful not to crop out any important text.

If a signature, date, stamp, or small section is close to the edge, make sure it remains visible.
7. Improve the Scan if Necessary

Depending on the scanning tool, you may have options for improving the appearance of the document.

These can include:

  • Color
  • Grayscale
  • Black and white
  • Contrast
  • Image enhancement

For ordinary text documents, a clear black-and-white or enhanced document may be easier to read.

For documents containing colored stamps, diagrams, signatures, or photographs, keeping the original color may be more appropriate.

Don’t apply a filter simply because it is available. Choose the setting that keeps the important information clear.


8. Scan Additional Pages

If your document has multiple pages, use the option to add another page.

Repeat the same process:

  1. Position the next page.
  2. Capture it.
  3. Check the edges.
  4. Review the scan.
  5. Add the next page.

Continue until every page has been scanned.

Keeping all pages in one scan session can make it easier to save the complete document as a single PDF.


9. Check the Page Order

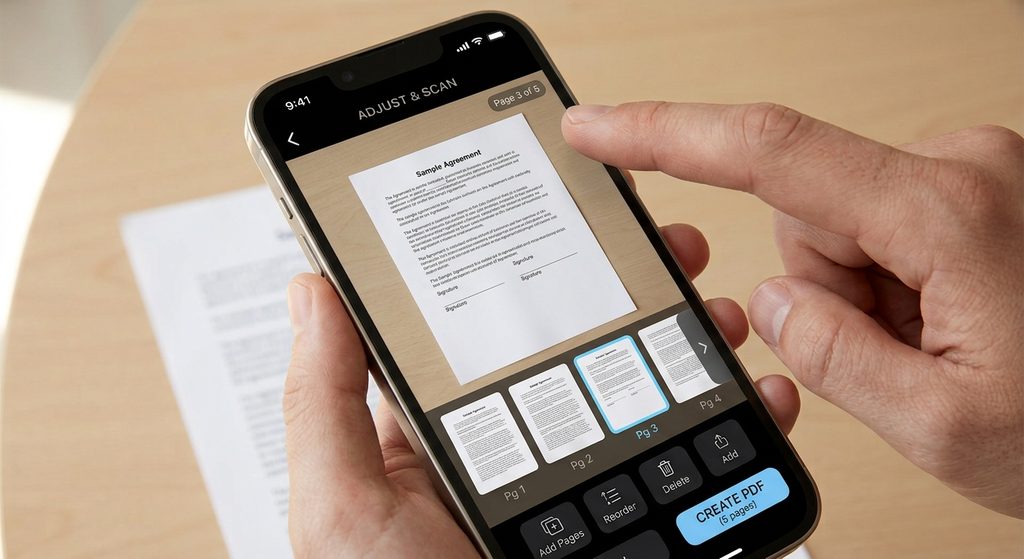
Before saving the PDF, review the pages.

Make sure:

  • Page 1 is first
  • Page 2 is second
  • No page is missing
  • No page was accidentally scanned twice
  • Pages are facing the correct direction

This is particularly important for applications, forms, contracts, assignments, and other documents where page order matters.
10. Save the Document as a PDF

When you are satisfied with the scan, use the available Save, Done, or Export option.

If the scanning tool provides a PDF option, select it.

Give the document a useful filename.

For example:

University_Application.pdf

or

Tax_Documents_September_2026.pdf

A descriptive filename makes the document easier to find later.

Avoid filenames such as:

Scan001.pdf

if you expect to create many scanned documents.


11. Check the PDF After Saving

Don’t assume the PDF is perfect immediately after saving it.

Open the saved PDF and check every page.

Make sure:

  • The text is readable.
  • Nothing important was cropped.
  • Pages are in the correct order.
  • The document opens correctly.
  • Signatures and stamps are visible.
  • The PDF contains all required pages.

This quick check can prevent you from sending an incomplete or unreadable document.


12. Find Your Scanned PDF

The exact location depends on the scanning method you used.

A cloud-based scanning service may save the document to your cloud storage.

Another scanning app may save it to a folder on your phone.

If you cannot find the file, open your Files app and search for the filename or use the file type/category for PDFs.

You can also use the search function if your file manager provides one.


13. Share the PDF

Once the PDF is saved, you can share it using your phone’s normal sharing options.

Depending on your device and apps, you may be able to send it through:

  • Email
  • Messaging apps
  • Cloud storage
  • Nearby sharing
  • Other file-sharing services

Before sharing a document, check whether it contains private information such as an address, phone number, identification number, financial information, or signature.

Only send sensitive documents to the intended recipient.


14. Keep a Backup of Important Documents

If the scanned document is important, consider keeping a backup.

For example, you might save a copy in secure cloud storage and another copy on a trusted device.

Don’t rely on a single copy stored only on your phone.

This is especially useful for documents that would be difficult to replace.


Common Problems

The Scan Looks Blurry

Keep the phone steady and make sure the document has enough light.

Move the phone closer or farther away until the text is clearly visible, then capture the page again.

The Document Edges Are Cut Off

Make sure all four edges are visible before taking the picture.

You can also adjust the crop points after capturing the page.

There Is a Shadow on the Document

Move the light source or change the position of the phone so your hand and phone do not block the light.

The PDF Is Too Large

High-resolution scans can produce large files.

If your scanning app provides quality or compression options, you may be able to reduce the file size.

Be careful not to reduce the quality so much that small text becomes difficult to read.

I Can’t Find the PDF

Open the Files app and search for the filename or PDF files.

If you used a cloud-storage app, check that service as well.


Important Things to Know

  • Android scanning options vary by phone and app.
  • Good lighting can significantly improve scan quality.
  • Keep the entire document inside the camera frame.
  • Check every page before creating the final PDF.
  • Make sure signatures, stamps, and small text remain visible.
  • Use descriptive filenames.
  • Review sensitive documents before sharing them.
  • Keep backups of important documents.
  • Don’t assume every scanning app uses the same menus or features.

Conclusion

Your Android phone can be a convenient alternative to a traditional scanner for many everyday documents. With good lighting, a steady camera, and the right scanning feature, you can capture paper documents and save them as PDFs within minutes.

For multi-page documents, take the time to check the page order and review every page before saving the final PDF. Once saved, you can find the document through your phone’s file manager or cloud storage and share it digitally without needing a physical scanner.

You do not need a traditional scanner to turn a paper document into a PDF. An Android phone camera can scan documents and save them digitally, making it easier to store, share, print, or send them by email.

Depending on your phone and apps, you may be able to scan documents using a built-in camera feature, Google Drive, or another document-scanning app.

The exact buttons can vary between Android phones, so the steps below focus on the general process.

Main Points

  • Your Android phone can scan paper documents using its camera.
  • Good lighting makes scanned documents easier to read.
  • Place the document on a flat surface before scanning.
  • Keep the phone directly above the document when possible.
  • Multiple pages can usually be combined into one PDF.
  • Review the scanned pages before saving the final PDF.
  • Avoid photographing sensitive documents in places where other people can see them.
  • Use your own screenshots in the article to show readers exactly where to tap.

1. Prepare the Document Before Scanning

Start by placing the document on a flat, clean surface.

Remove anything that is covering the document, such as:

  • Other papers
  • Clips
  • Folders
  • Objects
  • Your hands

Try to flatten folded or curled pages as much as possible.

If the document has multiple pages, put them in the correct order before you begin.

A clean, flat document makes it easier for the phone camera to detect the edges and produce a readable scan.

2. Find a Document Scanning Feature

There are several ways to scan documents on Android.

Depending on your phone, you may be able to use:

  • A built-in camera document scanner
  • Google Drive
  • A dedicated scanning app
  • Another file or productivity app with scanning support

One convenient option is the document scanning feature available through Google Drive on supported devices.

Open Google Drive and look for the option to create or add a scanned document.

Your phone’s interface may look different depending on the Android version and app version.


3. Open the Scanner

After selecting the scan option, your phone will open the camera.

Point the camera toward the document.

Try to position the phone so that all four edges of the paper are visible.

Keep the phone reasonably parallel to the document instead of holding it at a steep angle.

4. Use Good Lighting

Lighting has a major effect on scan quality.

Try scanning the document in a bright area with even lighting.

Avoid placing the document directly underneath a strong light that creates a reflection.

Also avoid creating a shadow over the paper with your phone or your hand.

If the text looks dark, blurry, or difficult to read in the camera preview, improve the lighting before capturing the page.

A few seconds spent preparing the lighting can produce a much better PDF.


5. Capture the Document

Once the document is positioned correctly, capture the page.

Some scanning tools automatically detect the edges of the paper.

Others may allow you to manually adjust the corners after taking the picture.

After capturing the page, check the result carefully.

Look for:

  • Missing corners
  • Cropped text
  • Blurry writing
  • Shadows
  • Reflections
  • Tilted pages

If the scan is difficult to read, capture the page again before continuing.


6. Adjust the Document Edges

Some scanning tools allow you to adjust the edges of the document.

This is useful when the camera does not correctly identify the paper’s boundaries.

Move the corner points so that they follow the edges of the actual document.

Be careful not to crop out any important text.

If a signature, date, stamp, or small section is close to the edge, make sure it remains visible.

7. Improve the Scan if Necessary

Depending on the scanning tool, you may have options for improving the appearance of the document.

These can include:

  • Color
  • Grayscale
  • Black and white
  • Contrast
  • Image enhancement

For ordinary text documents, a clear black-and-white or enhanced document may be easier to read.

For documents containing colored stamps, diagrams, signatures, or photographs, keeping the original color may be more appropriate.

Don’t apply a filter simply because it is available. Choose the setting that keeps the important information clear.


8. Scan Additional Pages

If your document has multiple pages, use the option to add another page.

Repeat the same process:

  1. Position the next page.
  2. Capture it.
  3. Check the edges.
  4. Review the scan.
  5. Add the next page.

Continue until every page has been scanned.

Keeping all pages in one scan session can make it easier to save the complete document as a single PDF.


9. Check the Page Order

Before saving the PDF, review the pages.

Make sure:

  • Page 1 is first
  • Page 2 is second
  • No page is missing
  • No page was accidentally scanned twice
  • Pages are facing the correct direction

This is particularly important for applications, forms, contracts, assignments, and other documents where page order matters.

10. Save the Document as a PDF

When you are satisfied with the scan, use the available Save, Done, or Export option.

If the scanning tool provides a PDF option, select it.

Give the document a useful filename.

For example:

University_Application.pdf

or

Tax_Documents_September_2026.pdf

A descriptive filename makes the document easier to find later.

Avoid filenames such as:

Scan001.pdf

if you expect to create many scanned documents.


11. Check the PDF After Saving

Don’t assume the PDF is perfect immediately after saving it.

Open the saved PDF and check every page.

Make sure:

  • The text is readable.
  • Nothing important was cropped.
  • Pages are in the correct order.
  • The document opens correctly.
  • Signatures and stamps are visible.
  • The PDF contains all required pages.

This quick check can prevent you from sending an incomplete or unreadable document.


12. Find Your Scanned PDF

The exact location depends on the scanning method you used.

A cloud-based scanning service may save the document to your cloud storage.

Another scanning app may save it to a folder on your phone.

If you cannot find the file, open your Files app and search for the filename or use the file type/category for PDFs.

You can also use the search function if your file manager provides one.


13. Share the PDF

Once the PDF is saved, you can share it using your phone’s normal sharing options.

Depending on your device and apps, you may be able to send it through:

  • Email
  • Messaging apps
  • Cloud storage
  • Nearby sharing
  • Other file-sharing services

Before sharing a document, check whether it contains private information such as an address, phone number, identification number, financial information, or signature.

Only send sensitive documents to the intended recipient.


14. Keep a Backup of Important Documents

If the scanned document is important, consider keeping a backup.

For example, you might save a copy in secure cloud storage and another copy on a trusted device.

Don’t rely on a single copy stored only on your phone.

This is especially useful for documents that would be difficult to replace.


Common Problems

The Scan Looks Blurry

Keep the phone steady and make sure the document has enough light.

Move the phone closer or farther away until the text is clearly visible, then capture the page again.

The Document Edges Are Cut Off

Make sure all four edges are visible before taking the picture.

You can also adjust the crop points after capturing the page.

There Is a Shadow on the Document

Move the light source or change the position of the phone so your hand and phone do not block the light.

The PDF Is Too Large

High-resolution scans can produce large files.

If your scanning app provides quality or compression options, you may be able to reduce the file size.

Be careful not to reduce the quality so much that small text becomes difficult to read.

I Can’t Find the PDF

Open the Files app and search for the filename or PDF files.

If you used a cloud-storage app, check that service as well.


Important Things to Know

  • Android scanning options vary by phone and app.
  • Good lighting can significantly improve scan quality.
  • Keep the entire document inside the camera frame.
  • Check every page before creating the final PDF.
  • Make sure signatures, stamps, and small text remain visible.
  • Use descriptive filenames.
  • Review sensitive documents before sharing them.
  • Keep backups of important documents.
  • Don’t assume every scanning app uses the same menus or features.

Conclusion

Your Android phone can be a convenient alternative to a traditional scanner for many everyday documents. With good lighting, a steady camera, and the right scanning feature, you can capture paper documents and save them as PDFs within minutes.

For multi-page documents, take the time to check the page order and review every page before saving the final PDF. Once saved, you can find the document through your phone’s file manager or cloud storage and share it digitally without needing a physical scanner.

More from author

LEAVE A REPLY

Please enter your comment!
Please enter your name here

Related posts

Advertismentspot_img

Latest posts

How to Share Large Files From Your Phone Without Using a USB Cable

Sharing large files from your Android phone does not require a USB cable. Depending on the file size, internet connection, and device you are...

How to Stop an Android App From Running in the Background

Some Android apps continue working in the background even when you are not actively using them. This can be useful for apps that need...

How to Clear an App’s Cache on Android Without Deleting Your Account

When an Android app starts behaving strangely, loading slowly, or taking up more storage than expected, clearing its cache can sometimes help. The important part...

Want to stay up to date with the latest news?

We would love to hear from you! Please fill in your details and we will stay in touch. It's that simple!