

Converting images into a PDF can be useful when you need to combine photos, scanned documents, receipts, forms, or screenshots into one easy-to-share file.
You do not necessarily need a computer to do this. Depending on your Android phone and the apps you have installed, you can create a PDF directly from your phone using built-in sharing or printing options, Google Drive, or a dedicated PDF app.
The exact menus can vary between Android versions and phone manufacturers, but the basic process is similar.
Main Points
- You can turn one or multiple images into a PDF on Android.
- You can often create a PDF without connecting your phone to a computer.
- Multiple images can usually be combined into one PDF.
- Check the image order before creating the final PDF.
- High-resolution images can make the PDF file quite large.
- Review the finished PDF before sending or uploading it.
- Be careful when converting images containing private or sensitive information.
1. Choose the Images You Want to Convert
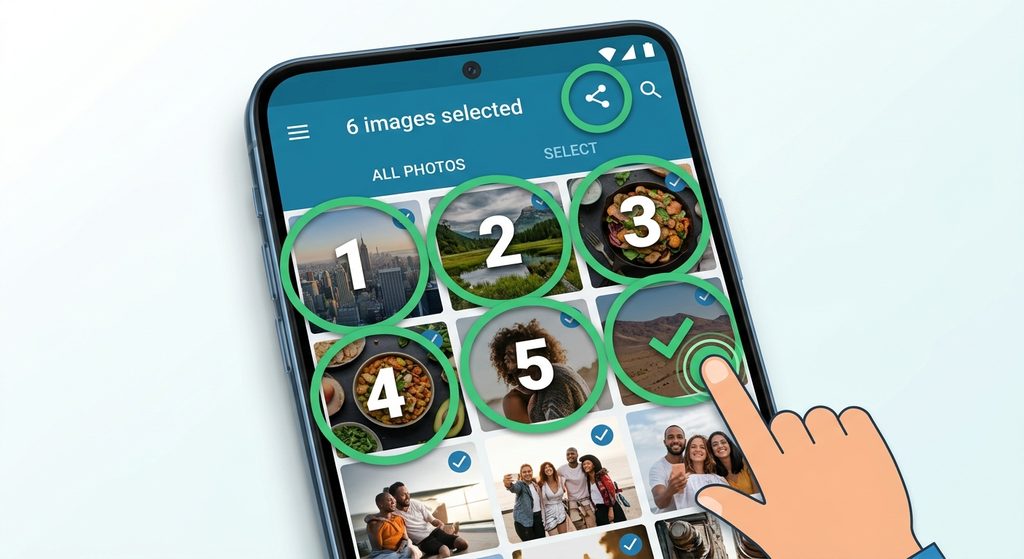
Start by finding the images you want to put into the PDF.
You can usually find them in your phone’s:
- Gallery
- Photos app
- Files app
- Downloads folder
- Screenshots folder
- Camera folder
If you are combining several images into one PDF, decide the order before starting.
For example, if you are converting a three-page document, the images should normally be arranged as:
Page 1 → Page 2 → Page 3
This makes the final PDF easier to read.
2. Use the Print Option to Create a PDF
Many Android phones provide a convenient way to create a PDF through the system’s printing interface.
The exact steps can vary, but the general process is:
- Open the image or images.
- Tap Share or the three-dot menu.
- Look for Print.
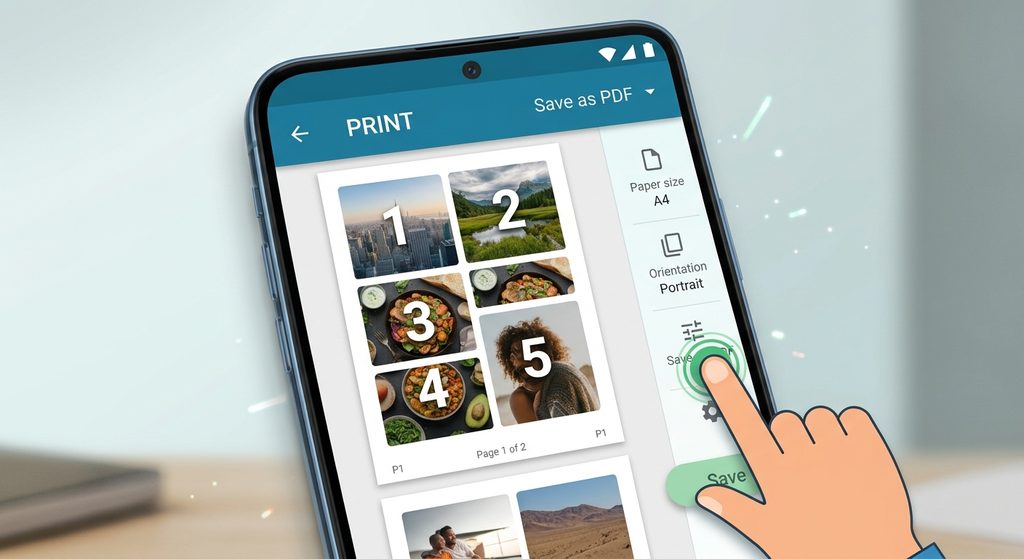
- Open the print preview.
- Select Save as PDF if that option is available.
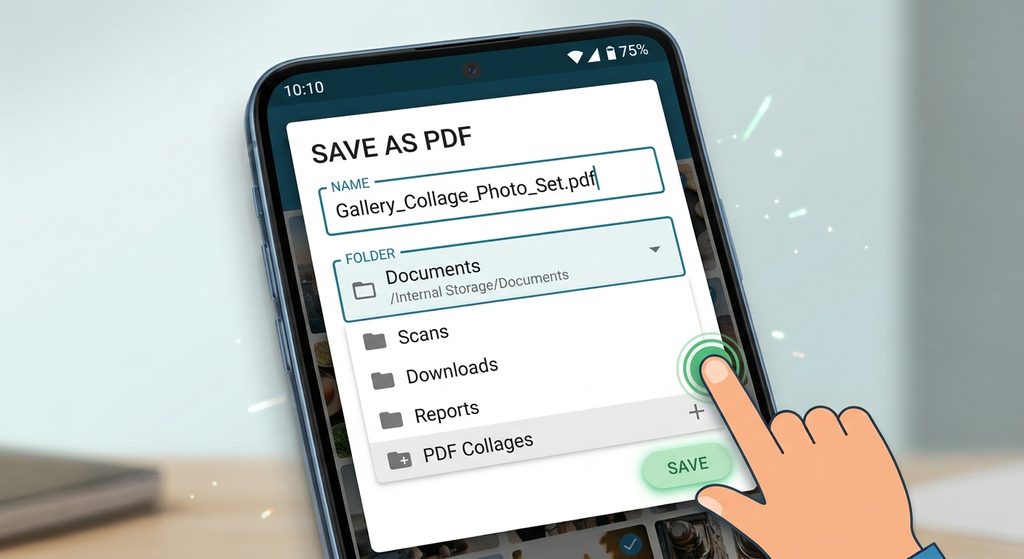
- Choose where to save the file.
- Give the PDF a useful filename.
- Save it.
Not every Gallery or Photos app presents the same options, so you may need to select the images first and then look under the sharing menu.
3. Select the Correct Paper or Page Settings
If the print interface provides additional settings, review them before saving.
Depending on your phone, you may see options related to:
- Paper size
- Orientation
- Number of copies
- Color
- Page layout
- Margins
For ordinary documents, a standard page size and portrait orientation may work well.
For landscape photos, you may prefer landscape orientation.
The available settings depend on the Android device and the application you are using.
4. Save the PDF
Once the preview looks correct, choose Save as PDF.
You may then be asked where you want to save the document.
Choose a location that you can easily find later.
Give the file a descriptive name such as:
Travel_Documents.pdf
or
Receipts_September.pdf
Avoid generic names such as:
Document1.pdf
if you plan to create many PDF files.
5. Create a PDF Using Google Drive
Another option is to use Google Drive if it is available on your phone.
Google Drive is particularly useful for documents because the resulting file can remain accessible through your cloud storage.
Depending on the version of the app, you can use its document-scanning features for paper documents and save the result as a PDF.
For existing image files, the available conversion options can vary, so check the current interface on your device.
A general workflow is:
- Open Google Drive.
- Start the relevant upload or scan process.
- Select or capture the document.
- Review the result.
- Save it as a PDF when the option is provided.
This method is especially useful when the original images are actually photos of paper documents.
6. Use a Dedicated PDF App
If your Android phone does not provide a convenient built-in conversion option, you can use a PDF or document-management application.
These apps may provide features such as:
- Image-to-PDF conversion
- Combining multiple images
- Reordering pages
- Cropping
- Rotating
- Compression
- Adding or removing pages
Before installing an app, check its developer, permissions, privacy information, and user reviews.
Avoid giving unnecessary access to personal files if the application does not need it.
7. Put Multiple Images Into One PDF
One of the most useful reasons to convert images to PDF is combining several pictures into one document.
For example, you might have five images representing pages of a document.
Instead of sending five separate image files, you can create one PDF containing all five pages.
The basic process is:
- Select all required images.
- Choose the PDF conversion option.
- Check the page order.
- Adjust orientation if necessary.
- Create the PDF.
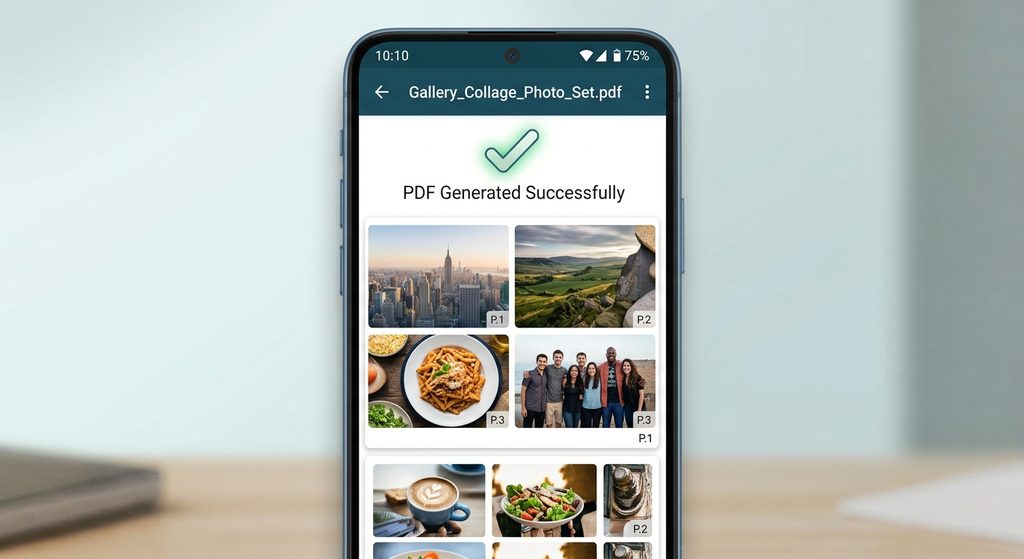
- Open the finished file.
- Check every page.
8. Check the Image Orientation
Sometimes an image is stored sideways even though it looks correct in the Gallery.
Before creating the PDF, check the orientation of every image.
If necessary, rotate the image first.
This is particularly important when combining:
- Scanned documents
- Receipts
- Forms
- Screenshots
- Photos taken in landscape mode
A few seconds of checking can prevent an awkward final PDF.
9. Crop Images Before Creating the PDF
If your image contains unnecessary areas around the document, consider cropping it first.
For example, if you photographed a paper form on a table, the original image might include:
- Table edges
- Background objects
- Empty space
- Shadows
Cropping can make the final PDF look cleaner.
However, don’t crop too aggressively.
Make sure you keep:
- Text
- Signatures
- Dates
- Stamps
- Important numbers
- Document edges
10. Reduce the PDF Size if It Is Too Large
High-resolution images can create very large PDF files.
For example, several modern smartphone photos can take up significant storage even before they are combined into a PDF.
If the finished PDF is too large to email or upload, check whether your PDF application offers a Compress PDF or similar option.
You can also reduce the image resolution before creating the PDF if extremely high resolution is not necessary.
For documents containing small text, don’t reduce the quality too much. The text should remain easy to read after compression.
11. Check the Finished PDF
After creating the PDF, open it and review the entire document.
Check that:
- All images are included.
- The pages are in the correct order.
- Images are not sideways.
- Text remains readable.
- Important areas were not cropped.
- The PDF opens normally.
- The file size is reasonable.
Don’t immediately delete the original images.
Keep them until you are sure the PDF is correct.
12. Find the PDF on Your Phone
If you cannot find the PDF after creating it, open your phone’s Files app.
Search for the filename you used.
You can also search for PDF files if your file manager provides a file-type filter.
The exact folder depends on the app and method you used to create the PDF.
If you saved it to cloud storage, check the relevant cloud-storage application as well.
13. Share the PDF
Once your PDF is ready, you can share it like any other file.
Depending on your phone and installed apps, you may be able to send it through:
- Messaging apps
- Cloud storage
- Nearby sharing
- Other file-sharing services
If the PDF contains private information, check the recipient carefully before sending it.
For documents containing IDs, financial information, addresses, signatures, or other sensitive information, avoid posting the PDF publicly.
Common Problems
I Don’t See “Save as PDF”
The option may not be available in the particular app you are using.
Try opening the image through another supported app or look for a Print option.
You can also use a reputable PDF/document application that supports image-to-PDF conversion.
My PDF Contains Only One Image
The method you used may only support converting one image at a time.
Try selecting multiple images before starting the conversion, or use an app that specifically supports combining images into a single PDF.
The Images Are in the Wrong Order
Reorder the images before creating the PDF if your app supports it.
Otherwise, create the PDF again with the images selected in the desired order.
The PDF Is Too Large
Large original images can create large PDFs.
Try using a PDF compression feature or reduce the image resolution while keeping text readable.
The PDF Looks Blurry
The original image may have been low quality, or excessive compression may have been applied.
Start with a clear, high-resolution image and avoid excessive compression.
Important Things to Know
- Android menus can differ between manufacturers and Android versions.
- Not every Gallery app provides the same PDF options.
- The Print → Save as PDF method may be available on many devices but isn’t presented identically everywhere.
- Multiple images can be combined into a single PDF when the selected app supports it.
- Check page order and orientation before saving.
- Large images can produce large PDF files.
- Keep original images until you have verified the PDF.
- Review privacy and permissions before using third-party PDF apps.
- Don’t upload sensitive documents to an unfamiliar service simply to convert them.
Conclusion
Converting images to PDF on Android can be a simple way to combine photos, scanned pages, receipts, forms, and other images into one easy-to-share document.
If your phone provides a Print → Save as PDF option, you may be able to create the PDF without installing another application. For more advanced features such as combining many images, reordering pages, cropping, or compression, a suitable document or PDF app may provide additional controls.
Whatever method you use, always open the finished PDF and check every page before sending or uploading it.